Fania-Love Tubes
  • Home
    • My Wishlist
  • News
    • Blog
  • TOU
  • Artwork
    • IM Letters
    • Wallpapers
    • Kits >
      • Freebies
      • PTU
      • Licenses and links
    • Tubes
    • CU >
      • CU freebies
  • Tutorials
  • My Masks
    • Masks (bulk dl)
    • Masks

Rippled Stones

5/8/2016

0 Comments

 
Picture

My tutorials are a guideline only, feel free to put your own spin to it :)

Materials needed:
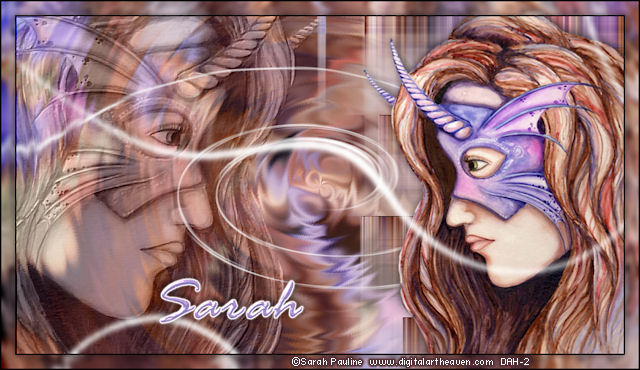
A tube, I used one from ©GiadaC, available at www.digitalartheaven.com

Filters used:
Mura's Meister: Copies
Eye Candy5: Textures
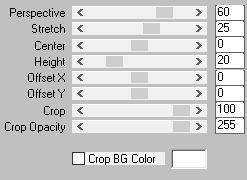
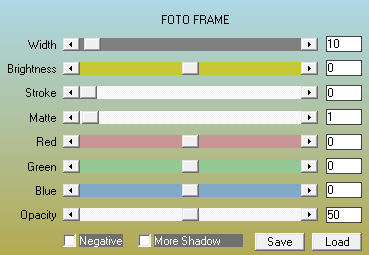
AAAFrames: Fotoframe

Let's begin
Open a new image 600x250
Copy your tube and paste as a new layer
Mura's meister: copies -> Wallpaper rotate, default settings.

Adjust, Blur, Motion blur: Angle 135, Strength 75%

Duplicate this layer.
on the duplicate:
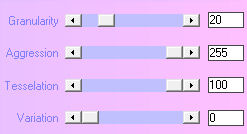
Effects, plugins, EyeCandy5, Textures, Stone wall.
At the settings tab choose: Blue Stone
At the basic tab choose a vibrant color from your tube as stone color and a light color from your tube for the mortar color.

Set the blend mode for this layer to screen ( or any other blend mode that fits your liking)
Layers, merge down

Copy your tube again and paste as a new layer.
Move to the right, and resize if needed, add drop shadow.
Now crop your whole image.

Activate the merged brick wall layer, with your selection tool :rectangle, draw a selection from left to right that will only contain the stones, just stop when you are getting near your tube.
Selections: Promote selection to layer, select none.
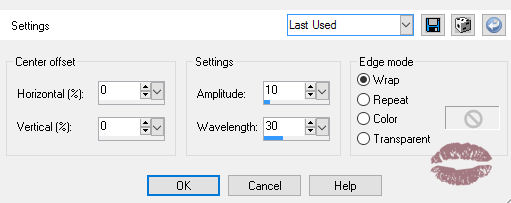
Effects: Distortion effects, Ripple and apply these settings:

​

Picture

Copy your tube and paste as a new layer.
Image, mirror and place it on the left side of your tag.
​Set the blend mode of this layer to screen
 ( or any other blend mode that fits your liking)
Layers, merge visible
​Effects, plugins, AAAframes, fotoframe.
Use the default setting but the first slider(width) must be set on 10.

Add the copyright and license info, your name and done :)
I hope you liked this tutorial

Sandra
​8 May 2016

0 Comments

Light reflections

9/28/2015

0 Comments

 
Foto

My tutorials are a guideline only, feel free to adjust your creation.

Materials needed
A tube: I used one from ©Janna Prosvirina @ www.digitalartheaven.com

Filters:
Mura's Meister: Copies & Perspective Tiling
​Xero: Fritillary
​Graphics Plus: Cross shadow
​AAAFrames: Foto frame


Let's begin:

New image 600x500 transparant
Copy your tube and paste as a new layer
Mura's meister Copies, wallpaper rotate, default settings
Crop your whole image.
Adjust, blur, motion blur --> Angle 45, strength 100%
Repeat 2 times
Effects, edge effects, enhance more
Duplicate this layer.
Image, mirror.
Change the opacity of this layer to 50%
Merge layers down. Rename this BG layer

Duplicate this layer
Effects, Xero Fritillary 


Picture

Effects, Mura's Meister: Perspective Tiling

Picture

Rename this layer Tiling

Activate BG layer in your layer palette
​Effects, Graphics Plus, Cross shadow, default settings
Copy your tube and paste as a new layer, Move to the left
Set the blend mode to overlay and opacity to 70%
Merge down.

Paste your tube again as a new layer
Image, mirror, move to the right and resize to your liking.
Add drop shadow to your liking.

Activate Tiling layer.
With your magic wand click on the transparant part of your layer
Selections, invert
Go to your tube layer and hit delete.
Select none.


Layers, arrange,  move up.
Crop your whole image.
Duplicate your tube layer.
Image, flip.
Move this layer down until it alligns with the bottom of the tag.
​Use the arrow keys on your keyboard for more controle.
With your deform tool, grab the middle top point and drag it down until you reach the beginning of the tiling layer.
Adjust, blur gaussian blur, 2.00
Move this layer below your tube layer.
Set the blend mode to overlay.

Layers, merge visible.
Effects, AAA Frames, Foto frame

Picture

Selections, select all, selections contract 12 pixels.
Selections invert.
Edit, copy
Select none
Image add borders, symmetrical 20 pix, white ( or any other color you like )
Select the border with your magic wand
Edit, Paste into selection.
Select none.

Resize your tag to 600 pix width
Add your license and the correct copyright info
and your name

That's it, I hope you liked my tutorial

Sandra
28-sept-2015

0 Comments

Luminance twirls

4/24/2015

3 Comments

 
Foto

Remember my tutorials are a guideline only, feel free to give it your own twist
What do we need:
Filters: Mura's Meister: Copies
             VM Distortion: Radiator II & Radiator III
              Graphics Plus: Emboss
              Toadies: Weaver
And a tube
I used one from ©Sarah Pauline @ Digital art heaven
Let's get busy


Open a new canvas 900x500 transparant.
Copy and paste your tube as a new layer.
Mura's meister copies, wallpaper rotate, default settings
Adjust, blur, gaussian blur : 7

Effects, VM Distortion, Radiator III, Default settings.


Copy and paste your tube as a new layer.
Move to the left, set blendmode to luminance legacy & opacity to 50%
Merge down.
Crop merged opaque.

Effects. Graphics plus, emboss, default settings


Copy and paste your tube as a new layer.
Image, mirror.
Effects, Toadies, weaver, default settings
Effects. Graphics plus, emboss, default settings
Move to the right.


Add a new layer.
Make a custom selection:
top 190. left 0. right 900, bottom 200.
Flood fill with white.Duplicate this layer and make the top one invisible in your layer palette
Select none


Activate the original white line.
Effects, VM Distortion, Radiator III, Default settings.
Adjust, blur, gaussian blur: 4
Effects, Distortion effects, twirl = 720


Copy and paste your tube as a new layer.
Image, mirror.
Move to the right, i resized mine by 80%, add shadow to your likings.


Make the duplicate white line layer visible again.
Effects, VM Distortion, Radiator II, Default settings.
Adjust, blur, gaussian blur :4
If this layer doesn't compliment your tube, or just isn't showing pretty, you can move it to your likings until it fits :)


Layers, merge visible, crop merged opaque.


Copy the image, it will stay on the clipboard.
Image, add borders, 2 pix black
Image, add borders, 20 pix any color but black
Select the colored border with your magic wand, feather & tolerance = 0
Paste into selection
Effects, VM Distortion, Radiator III, Default settings.
Adjust, blur, gaussian blur : 4
Select none


Image, add borders, 2 pix black
Resize your tag and then add copyright & license info & your name

And you are done
I hope you enjoyed this tutorial.


Written 24 april 2015
Sandra


3 Comments

    Author

    Here you will find another passion, writing tuts, I love seeing your results.

    Archives

    May 2016
    September 2015
    April 2015
    August 2014
    June 2014
    May 2014
    March 2014

    Categories

    All
    Aleksandra
    Animated
    CDO
    Christmas
    CT
    DAH
    FTU
    GiadaC
    Janna Prosvirina
    Leigh Young
    Martin Abel
    MTA
    PTU
    Sarah Pauline
    Sharron Wiley
    Sherri Baldy
    Tony T

    RSS Feed

Powered by Create your own unique website with customizable templates.