Fania-Love Tubes
  • Home
    • My Wishlist
  • News
    • Blog
  • TOU
  • Artwork
    • IM Letters
    • Wallpapers
    • Kits >
      • Freebies
      • PTU
      • Licenses and links
    • Tubes
    • CU >
      • CU freebies
  • Tutorials

A fairy nap

8/9/2014

0 Comments

 
Foto
Remember, my tutorials are a guideline only, you can use your own imagination :)


Materials used:
A scrapkit from Schnegges Scraps found here
A tube from ©Sherri Baldy from MTA here
A mask from Weescotslass #255 here

Filters used:
Eye Candy 4000: HSB Noise
----------------------------------------------
Let's Begin
New Image 600x600 pix. 72 dpi transparant.
Copy Paper 04 and paste as a new layer.
Apply the mask and merge group.

Copy frame02 and paste as a new layer.
Select the inside of the frame, selection, expand by 1 pix.
New layer.
Copy bubble and paste into selection.
Select none and move the bubble layer below the frame.
Activate the top layer.

Copy leaves and paste as a new layer, resize a little and move to the right.
Copy flower01 and paste as a new layer, resize by 50% move it on top of the leaves and duplicate this layer and move it again (see my tag)

Copy heart and paste as a new layer, move to the left.
Copy bird, paste as a new layer, image mirror.
Resize by 60%. Place on top of the heart.

Copy and paste your tube, resize if desired.
Copy and paste frog as a new layer, resize by 60%.

Give everything a dropshadow as desired.
Add the correct © & license info and your name.

If you do not wish to animate you can save it as jpg or png. And you are done.

If you want to animate read further.
Add a white layer atthe bottom of your tag.
Activate the layer with the heart.
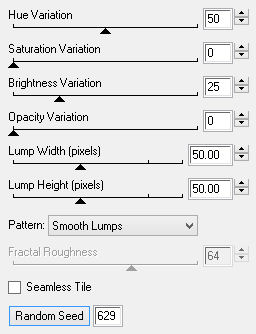
Apply HSB noise with these settings.


Picture

Copy merged and paste into Animation Shop as a new animation.
Go back to PSP, undo the HSB, apply HSB noise again but hit random seed once.
Copy merged and paste in AS after current frame.
Do this a few more times untill you have a total of 5 frames in AS
Select all frames and set the frame properties to 25.


Save as gif :)
Hope you liked it
©Sandra 9-Aug-2014

0 Comments

Happy 4th

6/10/2014

0 Comments

 
Foto

Remember, my tutorials are a guideline only, feel free to give it your own spin :)


Materials used in this tut:
-A ftu scrapkit form Tasha's playground called The Red, White & Blue
-A forum template by spawn, #120 here
-A tube from Sharron Wiley @ MTA
-The filters mura's Meister: Copies & Eyecandy 4000 :Gradient glow


Let's Begin


Open up the template, duplicate ( SHIFT+D) and close the original.
Delete the credits layer.
Activate main background:
Selections, select all
Copy paper 10 and paste into selection, select none


Delete the Background circles layer.
Activate left circle background and drag this one layer down.
Now you can merge the left  & right circle layer to one layer.
Do the same with the left & right circle layers, merge them to one layer.


Activate the merged left & right background layer.
Selections, select all, float, defloat, selections invert.
Copy paper11 and paste as a new layer. Hit Delete.Select none.
Delete the original layer.


Activate the merged left & right circle layer.
Adjust, add noise: Uniform, 100%, Monochrome checked.
Adjust, colorize, choose a red color.
Merge down.


Activate middle circle background.
Selections, select all, float, defloat, selections invert.
Copy paper13 and paste as a new layer. Hit Delete.Select none.

Delete the original layer.


Activate the middle circle border.
Adjust, add noise: Uniform, 100%, Monochrome checked.
Merge down.


Copy heartbrad and paste as a new layer.
Select the heart on the inside with your magic wand.
Selections, expand by 10 pix.
Make a new layer under the heartbrad layer.
Copy paper 10 and paste into selection.
Do not de-select yet.


Copy your tube and move the face (or an other part) into the heart frame.
Selections invert and hit delete. Select none.
Merge down.
Activate the heartbrad layer.
Copy star4 and paste as a new layer, move it to the right side ( look at my tag for reference).
Layers duplicate, image mirror, merge down.


Now crop merged opaque (crop your whole image).
You can add shadow to the different elements and layers as you like.
When you are done, merge visible.


Image, canvas size: 700x500 pix, position is centered.
Add a drop shadow.
Effects, mura's meister, copies :After image(rotate random) default settings.


Copy wordart and paste as a new layer.
Effects, eyecandy 4000, gradient glow.
Set glow width to 3 and choose a red color or blue.
Move it a bit to the right and up.


Copy and paste your tube as a new layer, Position where you like and add a drop shadow.
If you are happy, crop merged opaque.
Resize if needed , don't resize after you put on the copyright and license info.
I resized mine to 550 pix width and sharpened every layer once.


Add the correct copyright and license info on the tag and add your name


You are done, save as jpg or png
I hope you enjoyed this tut


©Sandra, 10-Jun-2014

0 Comments

City Games

5/18/2014

0 Comments

 
Foto

Remember, my tutorials are a guideline only, feel free to experiment:)

Materials needed:
-A kit of choice, I used Attitude by Tasha's Playground (FTU)
-A tube of choice, I used one by Tony T
-A mask of choice, I used Vix_Mask374


Let's Begin:
Open a new image 800x800 pix, transparent
( I like to work big , we will crop and resize when we are done)

Selections, select all.
Open paper 8 and paste into selection, deselect.
Apply the mask and merge group.


Open frame and paste as a new layer.
Open flowers and paste as a new layer. Place on the bottom left of the frame. Layers duplicate, image mirror, merge down and add drop shadow.
Open strap and paste as a new layer, move to bottom of the frame and add shadow.
Open leaf, paste as a new layer, move to the left of the strap, duplicate, mirror and merge down, apply a shadow.


Open flower, paste as a new layer, move left on top of the leaf, duplicate, mirror and merge down, apply a shadow.
Open bottlecap, paste as a new layer. Image free rotate, 15 degrees to the left. Place on the left flower, duplicate, mirror, merge down and add shadow.
Open dice, paste as a new layer, place it between the bottle caps and add dropshadow.

Activate your mask layer.
New raster layer, grab your selection tool rectangle and draw a rectangle on top of your frame.

Open paper10 and paste into selection. Leave selection running.
Open scatter and paste into selection. Leave selection running.
New raster layer.
Open cityscape and paste into selection. Deselect. Give the cityscape a shadow.


Activate your frame layer. Add drop shadow.
Now copy and paste your tube as a new layer, remove any parts that you see sticking out at the bottom. Add shadow.


To make the tube black and white I used effects, photo effects, black and white film.
I just hit the little dice a few times until I find the one I like, it is different for every tube.


When your done, crop merged opaque.
I resized my tag to 550 pix width.


Now you can add the copyright info, credits and your name
Save as jpg or png
I hope you enjoyed this tut
©Sandra 18-May-2014

0 Comments

    Author

    Here you will find another passion, writing tuts, I love seeing your results.

    Archives

    May 2016
    September 2015
    April 2015
    August 2014
    June 2014
    May 2014
    March 2014

    Categories

    All
    Aleksandra
    Animated
    CDO
    Christmas
    CT
    DAH
    FTU
    GiadaC
    Janna Prosvirina
    Leigh Young
    Martin Abel
    MTA
    PTU
    Sarah Pauline
    Sharron Wiley
    Sherri Baldy
    Tony T

    RSS Feed

Powered by
✕