Fania-Love Tubes
  • Home
    • My Wishlist
  • News
    • Blog
  • TOU
  • Artwork
    • IM Letters
    • Wallpapers
    • Kits >
      • Freebies
      • PTU
      • Licenses and links
    • Tubes
    • CU >
      • CU freebies
  • Tutorials
  • My Masks
    • Masks (bulk dl)
    • Masks

Checkered

3/26/2014

0 Comments

 
Foto

Remember, my tutorials are only a guideline, let your imagination free :)
Materials needed:
-A scrapkit of choice, I used: 2 Tix 2 Paradyce from Digicats and Dogs
-A mask of choice, I used: I used WSL_362 from WeeScotsLass
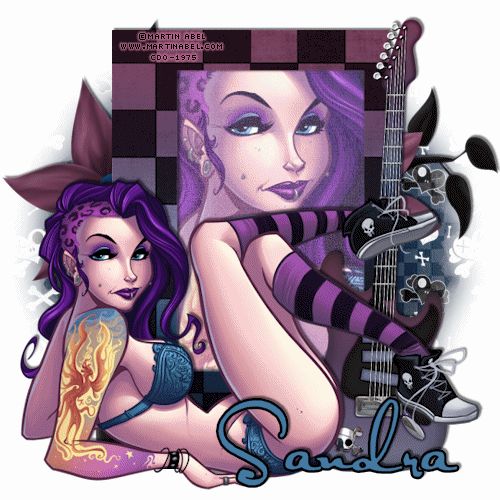
-A tube of choice, I used: ©Martin Abel @ CDO

Let's begin
 
Open your tube and mask in psp.
Open a new image, 500x500 white background.
New layer, select all, copy paper04 and paste into selection, select none.
Apply your mask.Merge group.
 
Now here is something different, instead of telling you where to put all the elements I have made a tag-build-up animation to show you how I did mine.
The original idea for this animation comes from René Kunert aka giZZy, and I was given permission to use it in my tutorials, Thank you giZ you're the best!!
http://www.rebel-dezigns.com/
The animation starts after I have applied the mask.


Foto

When you are done, add dropshadow to your likings, add your tube, name and the correct copyright info on the tag.
Now onto the animation.
 
Copy merged and paste into AS ( animationshop).
Go back to PSP.
Close out the tube in the frame.
Copy merged and paste into AS after current frame.
Copy the first frame, and paste after the second.
So now you have 3 frames.
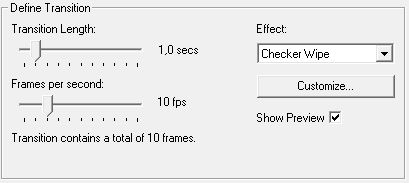
Select the middle one, hold CTRL and click on the first.
Go to Effects, Insert image transition and choose Checker Wipe with these settings.

Foto

Click customize and set horizontal & vertical checkers to 10
Click OK

Now do the same transition with your last 2 frames of your animation.
And you are done :)


©Sandra 21-Feb-2012

0 Comments

Breathe PTU

3/24/2014

1 Comment

 
Foto

Remember, my tutorials are only a guideline, let your imagination free :)
Materials needed:
-A scrapkit of choice, I used:
from Honored Scraps @ Whimsical Divas called: Just Breathe
-A mask of choice: I used one of my own, FL-Mask076, download here
-A tube of choice: I used ©Aleksandra @ MTA


Let's begin...


Open a new image 600x600 transparant.
Selections, select all.
Copy paper08 and paste into selection.
Select none.
Apply the mask you want to use.
Merge group.

Now here is something different, instead of telling you where to put all the elements I have made a tag-build-up animation to show you how I did mine.
The original idea for this animation comes from René Kunert aka giZZy, and I was given permission to use it in my tutorials, Thank you giZ you're the best!!
http://www.rebel-dezigns.com/
The animation starts after I have applied the mask.


Foto

Paste your tube, give everything a drop shadow as desired 
Add the correct copyright & license info after you have resized!

Finished :D
I hope you liked it

©Sandra 18-Sept-2013

1 Comment

'T Was the Night

3/23/2014

0 Comments

 
Foto


Remember, my tutorials are only a guideline, let your imagination free :)
Materials needed:
-A scrapkit from A space between : 'T Was the night
-A tube of choice : I used ©Leigh Young @ MTA
-My materials, containing a starry overlay and wordart


Let's begin...
Open new file 600x600 transparent
Selections, select all
Copy paper2.png and paste into selection
Selections contract 30 pixels, selections – modify feather – 30 pixels
Selections invert, hit DELETE twice
Selections, Select None

Copy and paste my starry overlay as a new layer.

Copy Ilex2.png and paste as a new layer
Drop Shadow of choice
Place  in the lower left corner
Layer duplicate, Image flip
Layer merge ,merge down
Layer Duplicate, Image mirror
Layer merge ,merge down

Copy RibbonFrame1.png and paste as a new layer
Image, resize 80%, all layers not checked
With your magic wand select insde the frame
Selections, modify, expand 8 pixels
Copy paper6.png and paste as a new layer
Selections, invert, hit delete
Selections, select None
Layers, arrange, move down

Activate your frame layer
Layers duplicate
Copy your tube and paste as a new layer
Resize if needed and place little to the left side of the frame ( see example)
Layers arrange, move down
Give the lower frame Drop Shadow of choice.
With your eraser erase the bits of your tube that are below the frame
Activate your upper frame layer and erase the pieces that covers the head

Duplicate  your upper frame
Copy Cane1.png and paste as a new layer
Layers, arrange, move down
Image, Free Rotate..  90 degrees left, all layers not checked
Image, Flip, place the cane  on the bottom left side( See exaple)
Give Drop Shadow of choice
Activate the upper frame and erase the bottom side which covers the cane

Copy ball7.png and paste as a new layer
Place the ring in the middle of the knot from the frame
Give Drop Shadow of choice
Copy Flower3.png and paste as a new layer
Image, resize 40%, all layers not checked
Adjust, Sharpness, sharpen
Give drop shadow of choice and place the flower on the top of the string 

Copy my wordart and paste as a new layer
Place the wordart in the ball

You are done !
Add your name, correct copyright & license info on the tag after you have resized.


©Sandra 08-Dec-2010
rewritten 28-Jan-2013
re-rewritten 23-March-2014

0 Comments

    Author

    Here you will find another passion, writing tuts, I love seeing your results.

    Archives

    May 2016
    September 2015
    April 2015
    August 2014
    June 2014
    May 2014
    March 2014

    Categories

    All
    Aleksandra
    Animated
    CDO
    Christmas
    CT
    DAH
    FTU
    GiadaC
    Janna Prosvirina
    Leigh Young
    Martin Abel
    MTA
    PTU
    Sarah Pauline
    Sharron Wiley
    Sherri Baldy
    Tony T

    RSS Feed

Powered by Create your own unique website with customizable templates.